marți, 22 ianuarie 2013

Color-Correction in a Tube


Pro Picks: Color-Correction in a Tube
One of my favorite parts of being a makeup artist is making skin look flawless. The skin is made up of multiple undertones and tints, and getting an even base requires the expert help of color correction. By neutralizing discoloration with a complementary shade instead of heavily layering  on the concealer, the result is a more realistic, even finish.
Why don’t concealers always do the trick? Traditional cover-up is usually dense and highly pigmented—layered opaquely to cover or camouflage. This isn’t always optimal, especially in TV or film. The effect can look very different on camera because of the way it absorbs light versus natural skin or foundation, adding excess texture on the surface of the skin.
In cosmetic color theory, two complementary colors (red and green, blue and orange, and purple and yellow) cancel one another out and neutralize when combined. For those with ruddy cheeks, sallow skin, or dark circles, it’s a makeup miracle.

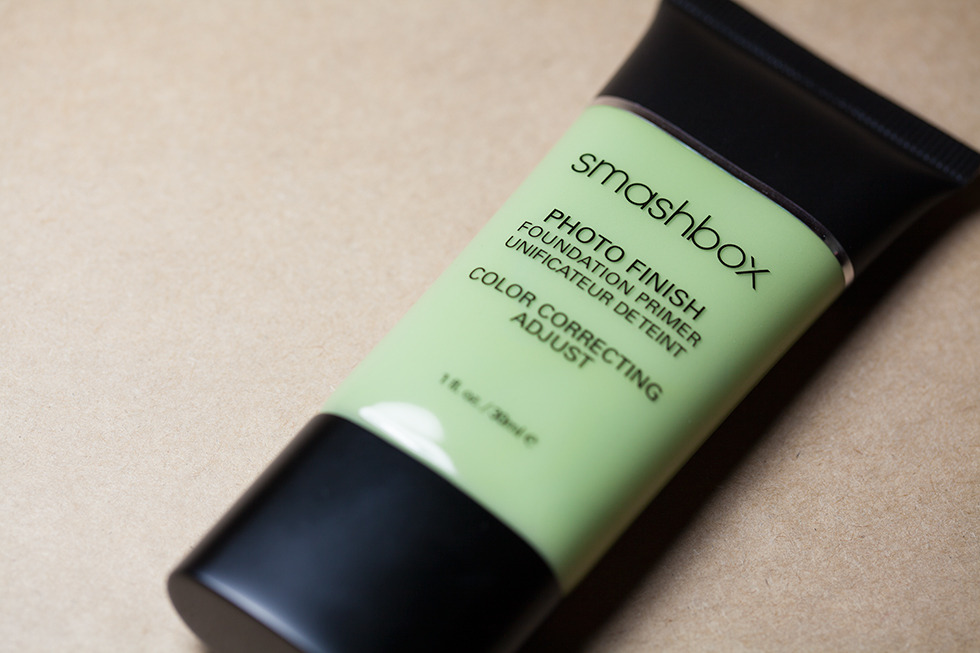
Face primers are the easiest way to try the technique out for yourself. Smashbox Cosmetics is the godfather of all color-correctors, and their Photo Finish Color Correcting Primers are legendary for ridding the skin of discoloration from rosacea, blemishes, or around the nose where people tend to have more redness showing through. You can use a thin, sheer, veil of color placed over the discolored area of the skin to neutralize and then adjust the color to skin tone.
A primer in the orange family is fantastic for getting rid of blue discoloration. I love to carry deep orange correctors for darker skin tones and a Smashbox Primer in Apricot for lighter complexions. For under eye discoloration, visible veins, and bruises, this apricot shade cuts those cool blue undertones—leaving the skin neutralized and ready for base makeup, or even on its own.
If you are dealing with sallow skin that needs a quick pick up, a lavender/lilac type of corrector will brighten and revitalize. Smashbox Cosmetics Photo Finish Color Correcting Primer in Balanced is a brilliant way to lift even the most tired skin. These three shades are available in travel size, too, which is so convenient for the makeup artist on the move.
So remember—creating a flawless canvas isn’t about painting over your imperfections. It’s about using the power of color to create beauty without packing on pigment. Understanding color correction will give you greater power to be a pro and help you make every client look model perfect. A must have for every kit.


Sursa: http://www.beautylish.com/a/vxvwn/pro-picks-color-correction-in-a-tube

vineri, 7 septembrie 2012

10 Shapes for Your Eyeshadow - Sfaturi pentru aplicarea fardului


I know many people who have used the same makeup style for a long while, not because it’s the favorite, but because it’s the only one they know how to do.
Maybe it’s just one shadow applied to whole lid, maybe two shadows mixed together from the middle of the lid, or something similar.
I decided to make this post to give you some ideas of how to use you darker shadows differently!

 Highlights:


Makeup is after all just play with lights and shadows, and to use lighter shades to bring certain
spots up more than others, and other points are made darker, so that they look like they’re deeper.
My highlight spots are in the inner corner of the eye, in the middle of the lid, and on the brow bone.

Different eyeshadow shapes:


There are countless ways how you can use your shadows, by mixing different colors, different textures,
and glitters, but here’s some ideas were to apply your makeup’s darkest shade:

 Inner corner:

You can add darker shadow only to inner corner of your lid, which seems reduce the space between the eyes.

 Outer corner:

If your eyes are close to each other, this may make them look further away from each other.
I have used this often, even though I don’t think I have close-set eyes, so I think this suits for other eye
types too.

Both corners:

I think this one is great for everyone,  it can be easily used in both dramatic looks with bold
colors, and with natural everyday looks with neutral colors. It doesn’t make
eyes look wider or smaller, and I think it suits for all eye types.

Outer corner, “catshape”:

Make eye look a bit tilted upwards, which creates a bit mysterious look. Also, if your lids
are bit droopy, this might bring them the “boost” they need.

Outer corner & crease, blended upwards:

This is my own favourite.
Darker shadow is applied to outer  corner and crease, then blended up towards the brow, where it
meets the highlighter, and blends together with it.
This is also good technique if you have hooded eyes, just extend the shadows so that they show up a bit.

Banana:

This technique can make your eyes  appear wider, and your lid “longer”.

Whole inner part:

This one isn’t for everyone, it easily makes you look angry, or your eyebrows look too heavy.
But you might want to try it, maybe with lighter colors.

 Just crease:

With dark color neatly on the crease you can deepen your crease a lot, make your
eyes look more deeper. If you add some light color to your lid, your lid looks bigger.

 Whole lid:

Depending on the color your using, this might be the most dramatic of these styles.
Be careful if you use bright colors, especially if you don’t want to draw too much attention to your eyes.

____
Please remember, that everyone has different eye shape, head shape, nose shape, and that all affects one way or the other to the makeup.
So don’t get depressed if some makeup style doesn’t fit you, just move on to the next style. Eventually you’ll find your own!


SURSA

marți, 4 septembrie 2012

Harta Tenului


What is your acne telling you?

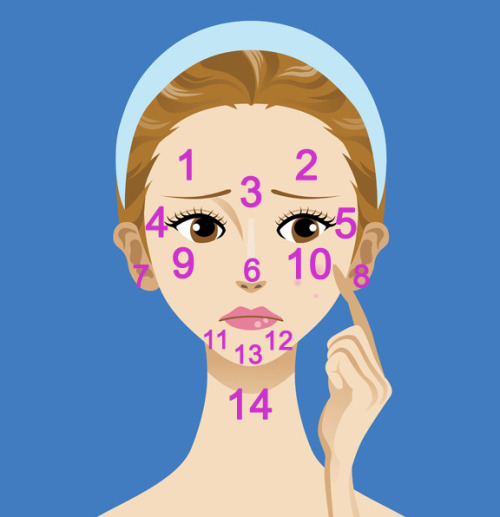
1 & 2: Digestive System — Eat less processed or junk food, reduce the amount of fat in your diet, step up water intake and opt for cooling things like cucumbers.
3: Liver — Cut out the alcohol, greasy food and dairy. This is the zone where food allergies also show up first, so take a look at your ingredients. Besides all this, do 30 minutes of light exercise every day and get adequate sleep so your liver can rest.
4 & 5: Kidneys — Anything around the eyes (including dark circles) point to dehydration. Drink up!
6: Heart — Check your blood pressure (mine was slightly high) and Vitamin B levels. Decrease the intake of spicy or pungent food, cut down on meat and get more fresh air. Besides this, look into ways to lower cholesterol, like replacing “bad fats” with “good fats” such as Omegas 3 and 6 found in nuts, avocados, fish and flax seed. Also, since this area is chock-full of dilated pores, check that your makeup is not past its expiry date or is skin-clogging.
7 & 8: Kidneys — Again, drink up! And cut down on aerated drinks, coffee and alcohol as these will cause further dehydration.
Zone 9 & 10: Respiratory system — Do you smoke? Have allergies? This is your problem area for both. If neither of these is the issue, don’t let your body overheat, eat more cooling foods, cut down on sugar and get more fresh air. Also keep the body more alkaline by avoiding foods that make the body acidic (meat, dairy, alcohol, caffeine, sugar) and adding more alkalizing foods like green veggies and wheatgrass juice. Another thing that most of forget – dirty cell phones and pillow cases are two of the top acne culprits and this area is what they affect the most!
Zone 11 & 12: Hormones — This is the signature zone for stress and hormonal changes. And while both are sometimes unavoidable, you can decrease their effect by getting adequate sleep, drinking enough water, eating leafy veggies and keeping skin scrupulously clean. Another interesting point: breakouts in this area indicate when you are ovulating (and on which side).
Zone 13: Stomach — Step up the fibre intake, reduce the toxin overload and drink herbal teas to help with digestion.
14: Illness — Zits here can be a sign that your body is fighting bacteria to avoid illness. Give it a break, take a yoga class, take a nap, take time to breathe deeply, drink plenty of water and know that everything always works out!

So the next time you break out or notice dark under-eye circles, look to your face map: your skin is probably trying to communicate on behalf of the internal organs. However, do remember that, as with all medical issues, it is always best to see your doctor or dermotologist for a proper prognosis. This is just a general guide to head you off in the right investigative direction – just becuase you break out between the brows doesn’t always mean you have a bad liver!

Sursa